
How to Insert a Duet Into a Duet Cover
You’ve just bought a gorgeous new duvet cover, fresh and crisp, ready to transform your bed. Then reality hits: wrestling a slippery duvet into a fabric tube feels like chasing a greased watermelon. If you’ve ever ended up with a lopsided, bunched-up mess, you’re far from alone. Nearly 80% of people find how to insert a duvet into a duvet cover genuinely frustrating.
The secret isn’t muscle. It’s method. With the right technique, you can get your duvet perfectly settled in under two minutes, solo, without a single thrown pillow. This guide walks you through three expert-backed methods, plus prep tips, troubleshooting, and care advice for a hotel-worthy bed every night.
Start With Smart Preparation
A few minutes of prep saves you from a wrestling match later. Set yourself up right, and the insertion practically does itself.
Wash the Cover Before First Use
Always launder your duvet cover before the first insertion. This removes factory residues, softens stiff fibers, and eliminates wrinkles that cause bunching. Going forward, wash the cover every two to three weeks to keep your bedding fresh and hygienic.
Choose a Flat, Spacious Surface
Work on a clean bed rather than the floor. Height gives you control, and a flat surface lets you align corners precisely. Clear away pillows and clutter so nothing gets in your way.
Flip the Cover Inside Out First
This is the single most overlooked step. Always begin with your duvet cover turned inside out. Doing so transforms the cover into a giant pocket you can manipulate from within, drastically reducing fabric slippage and misalignment.
Match Sizes and Secure Corner Ties
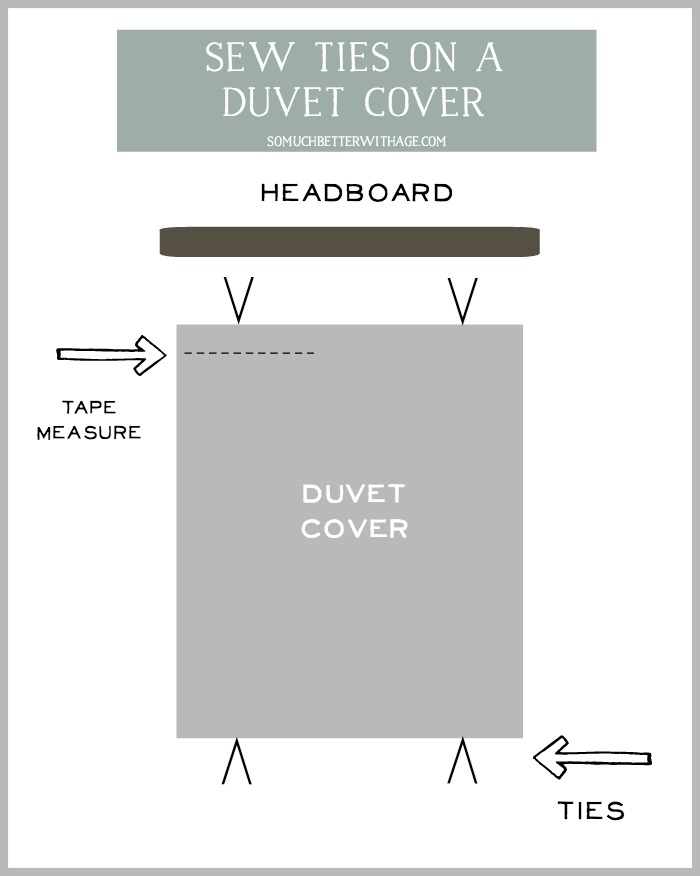
Confirm your insert and cover are the same size (twin, queen, king). Mismatched dimensions lead to bunching or excess fabric. If your set includes corner ties or loops, fasten all four corners before any rolling or flipping. Anchored corners prevent the insert from sliding around inside.
Use the California Roll Method (Burrito Method)
Best for: Solo users, beginners, and anyone who wants the easiest, most reliable result.
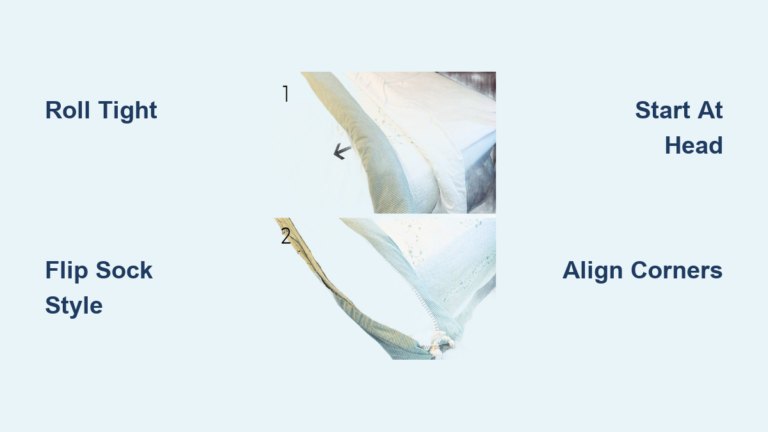
The California Roll is the gold standard for one-person duvet insertion. It works beautifully even with heavy inserts and takes under two minutes once you get the rhythm.
Lay the Cover Inside Out
Place the duvet cover on the bed with the wrong side facing up and the opening at the foot (closest to you). Smooth out every wrinkle so the fabric lies perfectly flat.
Place the Insert on Top
Set the duvet insert directly on top of the inside-out cover. Carefully align all four corners and edges. If your bedding has corner ties, secure them now at top left, top right, bottom left, and bottom right.
Roll Tightly Toward the Opening
Starting at the head of the bed, roll both the cover and insert together into a tight cylinder, like a burrito. Keep the layers aligned as you roll. A compact, even roll is the goal.
Pro Tip: Roll slowly and adjust as you go. Any misalignment now will create lumps later.
Pull the Cover Over the Roll
Grab the open edge of the inside-out cover and pull it up and over the entire rolled cylinder. You’re essentially stuffing the roll back into its own shell, turning the cover right-side out around the insert. Make sure you capture the full width of the roll.
Unroll and Fluff
Gently unroll the cylinder back toward the head of the bed. The duvet will emerge smooth and centered. Give it a firm shake to settle the filling, then fluff to restore loft.
Time Estimate: Under 2 minutes with practice.
Try the Traditional Inversion Method

Best for: Shorter beds or anyone who prefers a direct flip over a roll.
This method uses inversion: flipping the cover over the insert like turning a sock inside out. It requires a bit more coordination but works wonderfully with zippers and snug-fitting covers.
Lay the Insert Flat
Place the duvet insert on the bed and smooth it out completely. No wrinkles, no bunches.
Add the Inside-Out Cover on Top
Turn the duvet cover inside out and lay it directly on top of the insert. Align all four corners precisely. Keep the opening at the foot of the bed.
Grab the Top Corners
Reach into the open end of the cover and grab the top two corners of the cover along with the corresponding corners of the insert underneath. Pinch both layers together. If ties are present, secure them now.
Flip the Cover Over
Holding the top corners firmly, lift slightly and pull the body of the inside-out cover down and over the rest of the insert. A quick shake helps the cover slide over and turn right-side out. Some people prefer grabbing the bottom corners first and flipping upward, then sliding the cover down. Either approach works.
Settle and Close
Once the cover is fully turned, shake the duvet so the insert drops into the corners. Smooth the fabric, fasten any bottom ties, then zip or button the opening closed.
Warning: If the insert doesn’t settle properly, it likely wasn’t aligned at the start. Re-flip if needed.
Consider the Nova Way (Direct Insertion)
Best for: Lightweight inserts or covers with wide openings.
This method skips both rolling and flipping. You simply stuff and smooth. It’s less reliable for heavy or slippery duvets but can work in a pinch.
Open the Cover
Lay the duvet cover right-side out on the bed with the opening facing up.
Insert the Duvet
Push the duvet into the cover, aligning corners by hand as you go. Use corner ties or pockets to anchor the insert immediately.
Pull and Smooth
Pull the cover down over the insert, smoothing as you work your way to the foot. Tuck excess fabric for a clean finish.
Downside: High chance of misalignment. Expect more post-insert shaking and adjustment.
Choose the Right Duvet and Cover

The right materials make insertion easier and improve sleep quality long-term.
Pick the Right Insert
- Down: Luxurious, breathable, and excellent for cold sleepers, though heavier and pricier.
- Down-Alternative: Hypoallergenic, vegan-friendly, and easier to handle. Holds shape well during insertion.
- Weight: Lightweight for summer, heavyweight for winter, medium for year-round use.
Pro Tip: Own two inserts and swap seasonally. Keep your favorite cover, change the warmth.
Select a Smart Cover
- Material: Cotton slides more easily than linen. Linen is breathable but grippier.
- Color: All-white looks crisp but shows stains. Dark or patterned covers hide wear and pet hair.
- Fit: Snug but not tight. A loose cover shifts; a tight one bunches.
- Closure: Zippers are the most secure. Buttons and ties work but can come undone.
- Corner Ties: Non-negotiable. They prevent slippage and keep the insert centered.
Maintain for Longevity and Comfort
A duvet system is only as good as the care you give it.
Wash the Cover Regularly
Wash the duvet cover every two to three weeks. This protects the insert, removes oils and allergens, and keeps your bed fresh. Use mild detergent and follow care labels.
Leave the Insert Alone
Duvet inserts rarely need washing. The cover shields them from dirt. When cleaning is required, follow manufacturer instructions, as many inserts are dry-clean only.
Store Covers Properly
When not in use, fold duvet covers neatly. They take up far less space than comforters and can be rotated seasonally or for decor changes.
Prevent Lumps and Matting
Shake and fluff your duvet daily to redistribute filling and prevent clumping. For down or down-alternative inserts, occasional tumble drying on low with clean tennis balls restores loft.
Fix Common Problems Fast
Even with great prep, issues pop up. Here’s how to solve them quickly.
Duvet Is Lumpy or Bunched
Cause: Misaligned corners or no corner ties.
Fix: Re-insert using the California Roll. Always secure ties first. Shake vigorously after unrolling.
Insert Keeps Shifting
Cause: Loose cover or missing ties.
Fix: Use a snug-fitting cover. Always tie all four corners. Choose a zip closure for extra security.
Cover Won’t Stay Closed
Cause: Broken zipper, loose buttons, or oversized insert.
Fix: Repair or replace the closure. Ensure insert and cover sizes match exactly.
Fabric Is Too Slippery
Cause: Smooth microfiber or silk-like materials.
Fix: Use the California Roll. It locks layers in place and prevents the slippery-slide effect.
Optimize for Your Lifestyle
Tailor your duvet routine to your specific needs.
Living Alone?
Use the California Roll. It’s the only method designed for solo efficiency, with no lifting, flipping, or help required.
Have Pets?
Choose smooth-surface covers to resist claw snags. Pick patterned or dark colors to hide fur. Use zippered closures to stop pets from burrowing inside.
Suffer From Allergies?
Go for down-alternative inserts and hypoallergenic covers. Wash the cover every two weeks to reduce allergen buildup.
Love Seasonal Changes?
Swap inserts, not covers. Keep one high-quality cover and two inserts (light and heavy). Change warmth without changing style.
Final Verification Checklist
Before making the bed, confirm:
- ✅ All four corner ties are secured.
- ✅ The filling is even, with no flat spots or lumps.
- ✅ The closure is fully fastened (zipper, buttons, or ties).
- ✅ The duvet has been shaken and fluffed.
- ✅ It lays flat on the bed with even overhang.
Frequently Asked Questions About Inserting a Duvet Into a Cover
What is the easiest way to put a duvet in a cover by yourself?
The California Roll (Burrito Method) is the easiest solo technique. You lay the cover inside out, place the insert on top, roll both into a tight cylinder, then pull the cover over the roll and unroll. It takes under two minutes with practice.
Should the duvet cover be inside out when putting in the duvet?
Yes. Always start with the cover inside out. This turns it into a pocket you can manipulate from within, which drastically reduces slipping and misalignment during insertion.
How do you keep a duvet from bunching inside the cover?
Use corner ties to anchor all four corners of the insert to the cover. This prevents the insert from sliding around and creating lumps. Shaking and fluffing after insertion also helps distribute the filling evenly.
How often should you wash a duvet cover?
Wash your duvet cover every two to three weeks. This removes sweat, oils, and allergens while keeping your bedding fresh and hygienic.
Can you put a duvet in a cover without rolling or flipping?
Yes, using the Nova Way (direct insertion). Lay the cover open, stuff the insert in, and smooth as you go. This works best with lightweight inserts and wide cover openings, but it’s less reliable for heavy or slippery duvets.
How long does it take to put a duvet in a cover?
With the California Roll method, a single person can complete the task in under two minutes. The Traditional Inversion Method takes slightly longer, usually around three to four minutes.
Key Takeaways for Inserting a Duvet Into a Cover

Mastering how to insert a duvet into a duvet cover comes down to three essentials: prep, technique, and the right materials. Always wash and flip your cover inside out before starting. Match your insert and cover sizes, and secure all four corner ties. The California Roll is your best bet for fast, solo, frustration-free results.
Once you’ve nailed the method, you’ll spend less time fighting fabric and more time enjoying a perfectly made bed. Pair this with regular cover washing and seasonal insert swaps, and you’ll have a bedding system that’s both beautiful and effortlessly functional. No more lumps. No more frustration. Just smooth, hotel-style comfort every single night.
Your next step: Try the California Roll tonight. Lay your cover inside out, roll it up with your insert, and pull the cover over. Two minutes later, you’ll wonder why you ever struggled.